


StartUp Bundle #1
All the GT rack effects setup parts you need to get started, except for the effects modules
 |
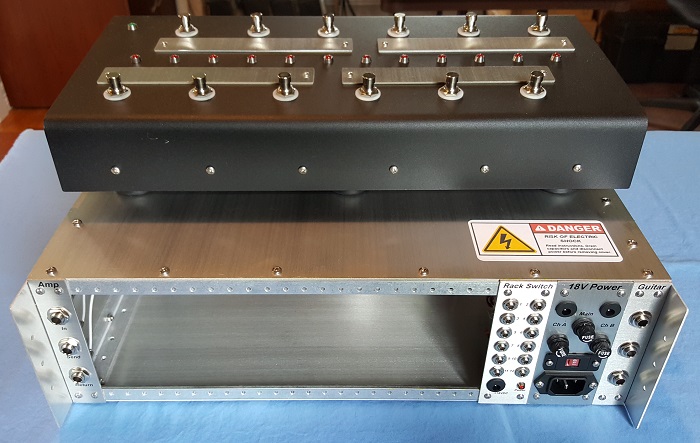 |
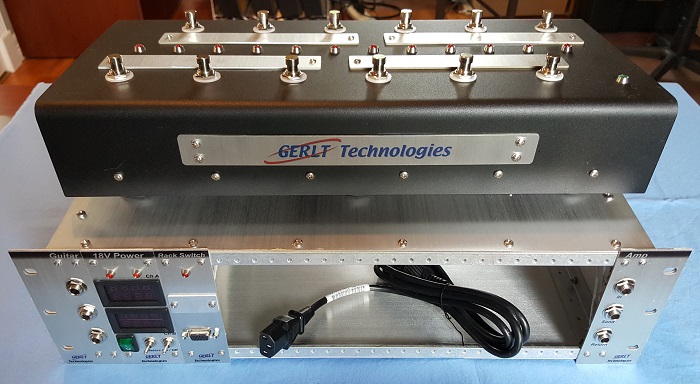
Startup Bundle #1 helps you jumpstart a rack effect setup with discounted bundle pricing. It uses our super-duty 12-Button Footswitch to get your medium to large rack effect setup ready for gigging and touring.
Configuration
There are several ways to configure "all the other stuff" you need besides the effects modules for your GT effects. This configuration is what we would call a "standard" startup configuration. It includes:
- 3U Enclosure - including Rear Supports (not pictured)
- Unbuffered Guitar Pass Thru left wing module
- Unbuffered Amp Pass Thru right wing module
- 18V Power module (110V power cable included). Please read the description of the 18V Power module for important details.
- Rack Switch switching module
- 12-Button Footswitch
- screws, nuts, washers
This is everything you need to start your first order configuration. Each enclosure has 17" of horizontal space for modules. The four included modules take up 5.5", leaving you with 11.5" for effect and Filler Modules which together must fill the entire 11.5". All you need to complete your configuration is to select 11.5" of effect and filler modules.
If your selected effects modules take up more than 11.5", then you'll need to add another 3U enclosure, which must also be filled with 17" of modules, either effects or filler modules. In that second enclosure, you must have one module that is configured for the left wing position and one module configured for the right wing position. The descriptions for each module will tell you if they are available in wing configurations and describe any module configuration constraints for wing positions. Of course, we're happy to help with any of this - just send us a note at:
This email address is being protected from spambots. You need JavaScript enabled to view it.
In addition to the modules, you'll need some cables, which we don't (yet) offer:
- switching cables to connect each effect module to the Rack Switch module. These are inexpensive and widely available from cable dealers in various lengths, often with quantity discounts. Usually 12" lengths are sufficient, but since the enclosure is 17" wide, you may need some 18" ones, too. Or just get 18" ones and cable tie the extra length. See Switching for details.
- two standard DC power daisy chain cables like you probably already use for your pedals. See 18V Power for details.
- a VGA cable to connect your 12-Button Footswitch to the Rack Switch module. See 12-Button Footswitch for details.
- standard 0.25" (mono or stereo) instrument/audio patch cables to connect everything in the back (like the ones you use with pedals on your pedalboard):
- one from Guitar Pass Thru to your first effect module input
- one from each effect module output to the next effect module input
- one from your last effect module output to the Amp Pass Thru module
If you have difficulty sourcing cables, let us know and we'll help you find some.
If you end up with a multi-enclosure configuration, you may need some longer switching cables to reach from the Rack Switch module in one enclosure to the more distant modules in the second enclosure. Similarly, you may need to chain some additional DC power daisy chains. You may also need a couple of longer audio patch cables.
Of course, you'll also need a guitar, guitar cable, amp, and amp cable, but you already have that.
Buffers
No buffers are included in the base configuration
Options
Please note that the option prices below are available only with the purchase of this bundle. Similar options are available if you purchase the modules, enclosures, etc separately.
- Guitar Pass Thru Buffers - See Guitar Pass Thru and our Buffer modules for details about the buffer options
- Amp Pass Thru Buffers - See Amp Pass Thru and our Buffer modules for details about the buffer options
- In/Out Pass Thru - Replace the Guitar and Amp Pass Thru modules with an In/Out Pass Thru module. See In/Out Pass Thru for configuration details. Note that you will need to select a right wing effect module to complete your configuration.
- Adhesive Feet - If you aren't racking your enclosure and prefer to place it on a level surface instead, it is recommended that you put some adhesive rubber feet or something similar on the bottom of the enclosure. The edges of the enclosure and screw heads could scratch the surface of whatever is below the enclosure. Also, the front panels of the modules hang below the bottom of the enclosure. It is best if the panels do not sit on any surface, so use feet or "bumpers" as they are often called that are tall enough to hold the front panels off the table or whatever is below the enclosure. These particular adhesive feet are nothing special - just large enough to do the job. You can also find suitable feet at your local hardware store. They stick on pretty well, but you'll likely have one come off and get lost eventually.
The 12-Button Footswitch can be cabled on the left or right. Please specify which you prefer for your configuration. Note that we have a couple of different styles for the silver "tags" on the top of the footswitch which are used to label your individual switches. The one pictured has four tags. A minor update to our design provides for two tags, which go below each row of switches without the break or gap in the middle of the four-tag design.
You can also specify the order for us to mount your modules (included ones and effects and fillers you choose) in the enclosure(s). The wing modules must go in the extreme left and right positions, of course. We normally put the 18V Power module next to the left wing module, and the Rack Switch next to the 18V Power module, but that can also be changed. It is easier to install future modules if all your existing modules are grouped to the left or right without fillers between them. By default, that would group all the filler modules, if any, on the right, next to the right wing module.
If you have filler modules in your full configuration, try to make them 1.5" or 2" wide. If you have enough filler modules, you may want to get a mix of 1.5" and 2" modules if that works out for the space you have. Most modules are those widths. Then you can swap out a filler module for an effect module and hopefully avoid needing another filler module of some other size at that time. If you are really planning ahead and know the widths of future modules you might likely order, then perhaps get filler modules of those widths.
By default, everything you order will come fully assembled.
Base Configurations
| Part # | Description | List Price |
| BNDL-STARTUP-1 | StartUp Bundle #1 | $1095 |
Options
| Part # | Description | List Price |
| BOPT-GTRPT-BUF | Buffered Guitar Pass Thru, 1 or 2 Buffers | $69 |
| BOPT-AMPPT-BUF | Buffered Amp Pass Thru, 1 or 2 Buffers | $69 |
| BOPT-IOPT | Replace Guitar and Amp Pass Thrus with Left Wing Unbuffered In/Out Pass Thru | -$49 |
| BOPT-IOPT-BUF | Replace Guitar and Amp Pass Thrus with Left Wing Buffered In/Out Pass Thru, 1 or 2 Buffers | $19 |
| BOPT-3UAF | Adhesive Feet for 3U Enclosure | $5 |